

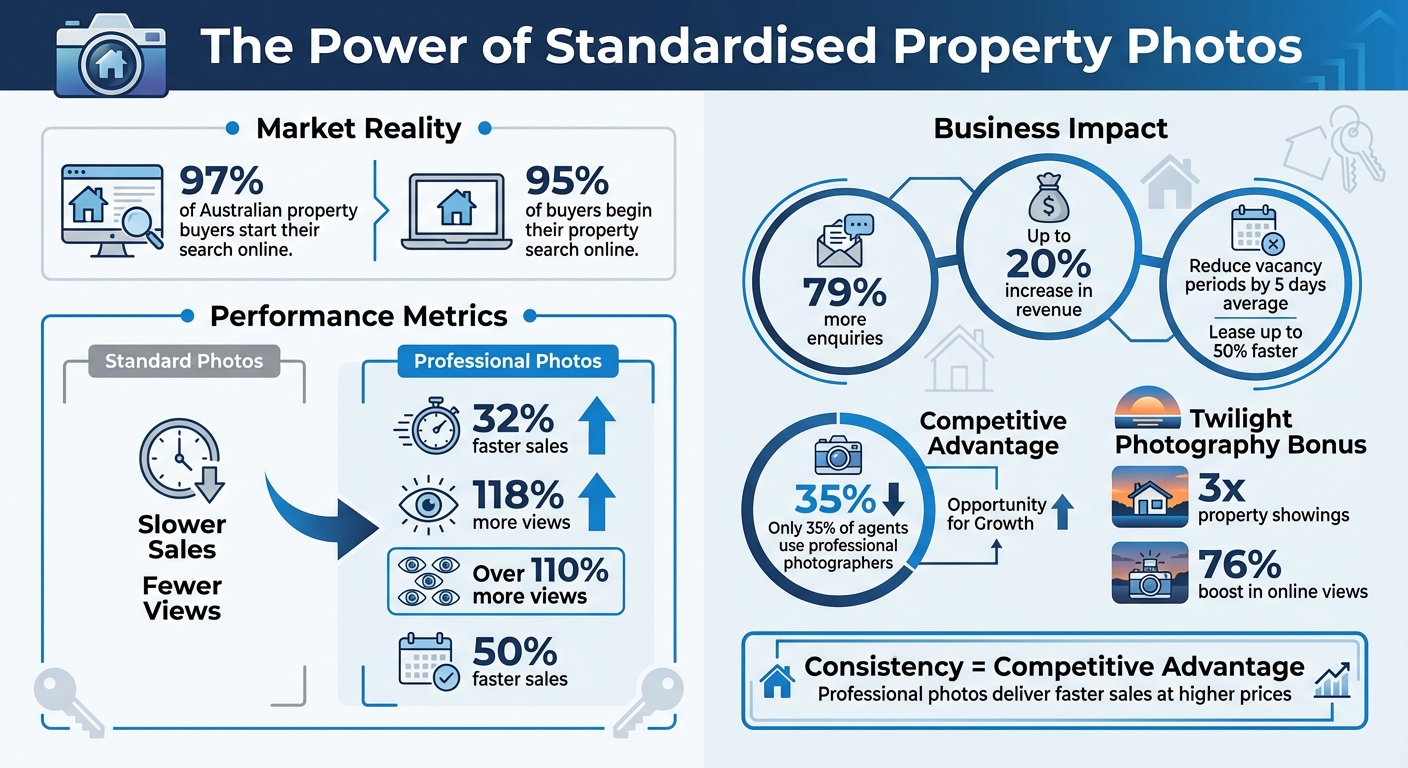
Standardising property photos is a game-changer for real estate agencies. It ensures your listings maintain a polished, professional look that buyers trust. Why does this matter? 97% of Australian property buyers start their search online, and listings with consistent, high-quality photos sell notably faster and attract substantially more views. A cohesive photo style not only boosts your brand’s credibility but also simplifies workflows and increases revenue by up to 20%.
Here’s how to achieve it:
- Define your photo style: Align it with your target audience (e.g., luxury, coastal, urban).
- Create a style guide: Include technical standards like resolution, white balance, and editing rules.
- Focus on Australian preferences: Bright, naturally lit images with outdoor appeal are key.
- Use the right tools: Software like Adobe Lightroom, Photoshop, and AI-driven tools can streamline editing.
- Train your team: Share guides, presets, and checklists to ensure consistency.
Setting Up Photo Branding Guidelines for Your Agency
Defining Your Signature Photo Style
Your signature photo style is the visual thread that ties all your property listings together - it's how your agency presents itself visually. Whether you want to project luxury for high-end homes, a breezy coastal vibe, or a sleek, urban feel, your style should align with your target audience and stay consistent across all your listings.
Once you've nailed down this look, document the technical details in a style guide to ensure everyone on your team is on the same page.
Documenting Your Photo Standards
Take the essence of your visual style and turn it into a set of clear, written instructions for your team. A style guide makes your preferences actionable. Include specific standards for brightness, shadow/highlight balance, and white balance. Using before-and-after examples can help clarify acceptable practices, like showing how proper window masking keeps outdoor views crisp instead of washed out.
Your guide should also cover composition rules, such as ensuring walls are straight, sticking to standard aspect ratios (like 3:2 or 4:3), and using the rule of thirds. Be detailed about editing techniques, specifying preferences for skies (e.g., clear blue or twilight), window masking, and even lawn touch-ups.
Technical Element Standard Requirement Purpose
Resolution 3,000–4,000px width Ensures high-quality images for MLS and online platforms
Colour Profile sRGB Keeps colours consistent across devices
File Format JPEG (Web), TIFF (Print) Optimises images for various uses
Aspect Ratio 3:2 or 4:3 Ensures compatibility with listing portals
White Balance 4,000K – 7,000K Provides neutral, realistic colours
Your guide should also outline what to remove from photos (like cords, bins, or personal items) and what must stay to comply with consumer laws. Include file naming conventions (e.g., PropertyAddress_Room.jpg) and stress the importance of mobile optimisation, given the prevalence of smartphone property searches.
"A well-defined style gives your brand a signature look that clients recognise and trust." – PhotoUp
Finally, create a review checklist for editors to confirm key details like vertical alignment, consistent colours, and mobile readiness before publishing any images.
Meeting Australian Real Estate Photo Expectations
Tailor your photo guidelines to meet the expectations of Australian buyers. Locals tend to favour bright, naturally lit images that showcase outdoor spaces. Shooting between 10 am and 2 pm often provides the best natural light for this purpose.
Given Australia's love for outdoor living, focus on curb appeal. Your guidelines should include techniques like lawn greening, enhancing pool colours, and replacing skies to make outdoor areas shine. Twilight photography, achieved through "day-to-dusk" conversions, can also highlight a property's atmosphere. In fact, studies show that twilight images can triple property showings and boost online views substantially.
Incorporate the "flambient" technique into your standards. This approach combines flash and ambient light exposures to create interiors that feel both detailed and inviting. Pay close attention to architectural lines - vertical walls and door frames should remain perfectly straight, correcting any distortion from wide-angle lenses.
Window management is another key area. Techniques like window pull or masking ensure a balance between indoor light and clear outdoor views, avoiding overly bright or blown-out windows. For instance, a Coolum Beach townhouse saw a threefold increase in listing clicks after using balanced exposure methods that preserved natural sky details.
For major Australian real estate portals like realestate.com.au, your guidelines should specify that hero images focus on property features, amenities, aerial shots, or masterplans - avoiding people, graphics, borders, or text. Recommended image dimensions are at least 2,000px x 1,500px (4:3 ratio) or 3,000px x 1,688px (16:9 ratio).
Transparency is critical when it comes to editing. While enhancements can elevate a property's appeal, you must disclose any substantial alterations. The Real Estate Institute of Australia emphasises the importance of being upfront about edits, like virtual staging or sky replacements, to maintain trust with buyers.
"It's not about creating misleading images; it's about presenting properties in their best possible light while maintaining authenticity and trust with potential tenants and buyers, as required by Australian consumer protection laws." – Tiffany Bowtell, CEO, PMVA
sbb-itb-1b6d2bc
Boost Your Real Estate Photography Workflow With EXPERT Advice
Tools and Software for Photo Standardisation
Keeping your agency's branded standards intact requires reliable editing tools and an efficient workflow.
Photo Editing Software and Preset Filters
For photo editing, Adobe Lightroom is ideal for quick batch processing and basic adjustments, while Adobe Photoshop handles detailed edits like object removal or HDR merging. You can get both through the Photography Bundle for approximately A$30.99 per month.
Using presets is a smart way to maintain consistency across your images. These presets apply uniform exposure, contrast, and colour settings. For example, you can configure Lightroom to automatically apply your agency's preset during import, creating a consistent starting point for every photo. Once you've edited a "hero shot" for a room, the "Sync" button in Lightroom allows you to replicate white balance and exposure settings across all similar images.
If you’re looking for a more advanced option, Imagen offers AI-driven editing that learns your unique style from past projects. Unlike static presets, Imagen's Personal AI Profile adapts to the specific lighting and content of each image. Keep in mind that this service charges extra per HDR photo and for automated perspective corrections. For a simpler alternative, Luminar Neo provides AI-powered analysis and automatic editing suggestions for a one-time fee of around A$109.
"The primary function of real estate post-production is to ensure colour accuracy and correct geometric perspective." – Itamar Haim, Imagen
For high-quality HDR blending, shoot in RAW, use a tripod, and bracket 3–5 exposures (e.g., -2, 0, +2 EV). Tools like Photomatix Pro (available for a one-off cost of about A$99) can then merge these exposures seamlessly.
With these tools, you can establish a streamlined editing process that saves time and effort.
Batch Processing for Multiple Images
Batch processing is a game-changer when working with large volumes of photos. In Lightroom, you can edit one reference image for a property and then sync its settings across the entire batch. This ensures consistent lighting, colour tones, and overall mood for all photos in a listing.
Photoshop's "Actions" feature is another powerful tool. It records multi-step editing processes - such as resizing, sharpening, and watermarking - so you can apply these edits to entire folders with a single click. Export presets further simplify the workflow, automatically resizing images to meet MLS standards (e.g., 1920×1080 pixels) and applying standardised file names.
To handle different lighting conditions, create scene-specific presets for interiors and exteriors while maintaining a cohesive look. Batch processing can also tackle lens distortions and straighten vertical lines, both critical for professional real estate photography.
Keep in mind that manual HDR photo merging can take 25–60 minutes per property. However, listings with professionally edited photos tend to lease up to notably faster and reduce vacancy periods by an average of five days.
Cloud Storage for Team Collaboration
After editing and batch processing, cloud storage ensures team alignment and quality control.
A shared cloud repository is perfect for storing presets, actions, and your agency's Photo Editing Style Guide. Services like Google Drive, Dropbox, or OneDrive allow editors to access and apply the same branding elements. Organise each listing into subfolders (e.g., RAW, Edited, Exports, Final Delivery) and use standard file naming conventions (like 123MainSt_LivingRoom_01.jpg) to keep everything searchable and organised.
Adobe's Photography Plan includes 1TB of cloud storage, along with "Smart Previews" that let team members edit images without needing full-resolution files. For a more integrated approach, consider platforms that offer automated sorting, feedback tools, and client approval systems.
To ensure quality, use your folder structure to reflect editing progress. For example, move photos from the "Edited" folder to a "Final Approval" folder only after they’ve passed a branding checklist. This step ensures that clients and listing portals receive polished, consistent images every time.
Building a Workflow for Consistent Photos
A well-structured workflow ensures that every property listing consistently reflects your agency's brand while maintaining efficiency. By tying together preparation, photography, and editing, you can achieve high-quality visuals without slowing down your team.
Property Preparation Before Photoshoots
The foundation of great property photos starts with preparation. Sending vendors or tenants a standardised checklist ahead of the shoot helps minimise delays. This list should cover essentials like cleaning surfaces, clearing benchtops, turning off ceiling fans and TVs, and removing personal items and pet-related belongings.
Lighting is key. Open blinds and curtains to maximise natural light, and turn on all interior lights. For exteriors, ensure driveways are clear of cars, garbage bins are hidden, lawns are mowed, and garden hoses or toys are out of sight.
Room-specific details make a big difference:
- Kitchens: Keep benches clear except for one or two premium appliances, and remove fridge magnets or flyers.
- Bathrooms: Clear toiletries, lower toilet seats, and display fresh towels.
- Bedrooms: Make beds neatly, using hospital corners, and remove any visible clutter under the bed.
"Cameras magnify any imperfections." – Riley Howe, LJ Hooker
Photographer Serena Pearce from Code Lime Photography advises sticking to the 10-minute rule: "10 mins at the most I say!". If significant decluttering is needed, consider charging a call-out fee or rescheduling the shoot to maintain your standards.
Consistency during the shoot is just as important. Use a tripod to keep the camera at a steady height (typically chest level) and ensure horizons are straight. Walk through the property first to identify the best angles for each room, focusing on corners and doorways to highlight flow and space. Keeping door frames and window edges straight in-camera reduces the need for extensive corrections later.
Once the property is ready, the focus shifts to editing for a polished, professional result.
Photo Editing and Quality Checks
A structured editing process ensures consistency across all images: File Organisation → Culling → Global Adjustments → Fine-Tuning → Export.
Start by organising files into property-specific folders and backing up RAW images. Select your "hero" shots and eliminate duplicates or blurry photos. For global adjustments, focus on white balance, exposure, and lens corrections. Group similar photos - like bedrooms or exteriors - and apply batch edits to save time and maintain uniformity.
To achieve a natural look, balance brightness by:
- Increasing shadows: +20 to +50
- Decreasing highlights: -20 to 0
- Adjusting whites: +10 to +30
Before delivering the final images, perform a thorough quality check. Zoom in to 100% to spot imperfections, colour inconsistencies, or exposure issues. Any enhancements, such as sky replacements or grass adjustments, should remain realistic to comply with Australian consumer protection laws.
Use clear file naming conventions (e.g., 123MainSt_LivingRoom_01.jpg) to make it easy to match images with listings.
…continued on the original article.